Evilginx 3.3 - Go & Phish
Evilginx 3.3 update is here and it comes packing with the special feature everyone has been waiting for.

Long time no hear in terms of Evilginx updates. While I'm still working on the release of Evilginx Pro, I've decided to fix a few issues and add new features to the public version of Evilginx, in the meantime.
First of all, I wanted to thank everyone for the great feedback and insightful discussions in the BREAKDEV RED community Discord. All of the reported issues and suggestions led to the improvement of Evilginx and this update is the fruit of such great community feedback.
Additionally, I wanted to use this opportunity to thank everyone for sending their applications to access BREAKDEV RED. We've gathered an incredible number of security professionals (almost 850 at the time of writing) and every day I'm learning something new from you guys, which I'm super grateful for. Hell, I've even finally fully understood how to properly configure the SPF/DKIM/DMARC combo thanks to all the discussion on the subject.
Vetting the applications takes a lot of time and before I open the registrations again, to the public, I'd like to automate the verification process a bit. Once I do this, requesting access to the community should be more accessible to everyone.
Allowing access only to red teamers with a clean conscience is still of utmost importance to me and it is the base for creating a friendly atmosphere, which fuels guilt-free information sharing.
This time I have something special for you. Never before have I had a request so popular that it was mentioned in 90% of all BREAKDEV RED application forms. Let it be known that your pleas have been heard.
Evilginx has an official integration with GoPhish by Jordan Wright from now on!
That's right - you will finally be able to create phishing campaigns for sending emails with valid Evilginx lure URLs and enjoy all the benefits of GoPhish's lovely UI, seeing which emails were opened, which lure URLs were clicked and which clicks resulted in successful session capture.
Here is the full list of changes coming in Evilginx 3.3 together with a full guide on how to use all the new features.
GoPhish Support
I've forked GoPhish and added the integration with Evilginx in the cleanest way possible. If you were using your custom version of GoPhish, merging Evilginx integration with your own fork should be relatively easy.
I have made the integration in such a way that Evilginx will be notifying GoPhish of the following events, which occur:
- A hidden image tracker is triggered when the email is opened. The tracker image is just a lure URL with specific parameters to let Evilginx know it should be used as a tracker.
- A phishing link is clicked within the email message. The phishing link within the email message sent through GoPhish is just the lure URL with embedded parameters.
- The session is successfully captured with Evilginx. Once Evilginx gathers the credentials and logs the cookies, it will notify GoPhish that the data has been submitted.
I've exposed additional API endpoints in GoPhish to make it possible to change the results status for every sent email.
Now, when you create a new campaign in GoPhish, you do not have a "Landing Page" to select. Instead, you will generate a lure URL in Evilginx and paste it into the "Evilginx Lure URL" text box.
What's more, GoPhish will automatically generate the encrypted custom parameters with personalized content, retrievable by Evilginx, for each embedded link. The personalized values embedded with every phishing link embedded within the generated email message are the following:
- First Name (
fname) - Last Name (
lname) - Email (
email)
This is super useful as you can use the custom parameters further to customize the content on your phishing pages within your js_inject scripts.
Let's say you wanted to pre-fill the email in the sign-in text box on the phishing page. Now you can just use the {email} placeholder within your injected script and you can be sure that GoPhish will deliver the right value for you. The same goes for {fname} and {lname}.
GoPhish will also embed the rid (Result ID) in the phishing link's parameters, so that Evilginx will know for which result it should update the status.
You can monitor the status of your mailing campaigns and check email deliverability, straight from GoPhish, but Evilginx will be the only side storing the credentials and authentication cookies.
How to set up GoPhish with Evilginx?
First of all, you need to get GoPhish from my forked GoPhish repository. You can either grab clone the source code and build it yourself or you can grab the binaries from releases.
Deploy GoPhish on the external server. It doesn't have to be the same server Evilginx is running on, but it will have to be reachable by your Evilginx instances. You can find out how to install GoPhish in its official documentation.
Once you have GoPhish running on a remote server and you also have Evilginx deployed and ready for action, you will need to tell Evilginx how it can communicate with your GoPhish server.
Configuring Evilginx
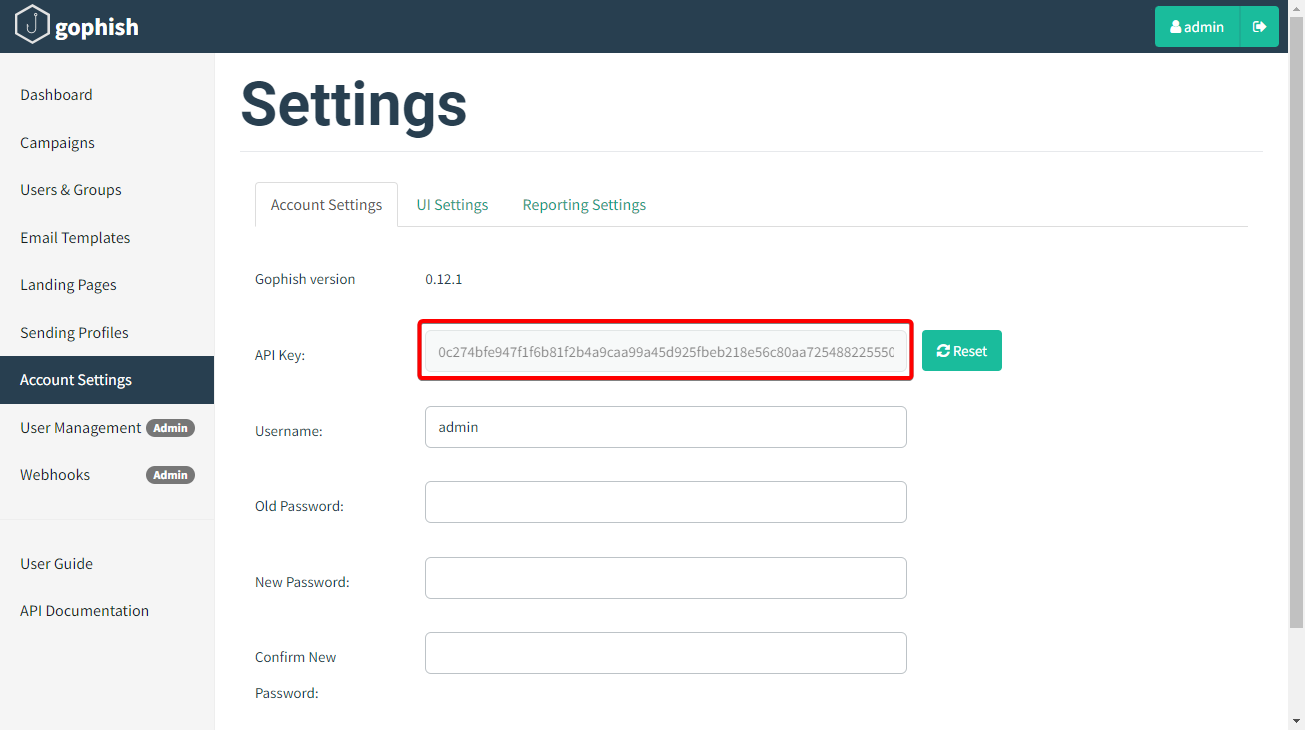
For this, you will need the Admin URL of your GoPhish instance and the API key. You can find the API key within the Account Settings in your GoPhish admin panel. To figure out the IP and port of your GoPhish instance, refer to the official documentation.
For example, if your GoPhish admin server is running on an IP 1.2.3.4 listening on port 3333, with TLS enabled, you can set it up as follows:
config gophish admin_url https://1.2.3.4:3333
config gophish api_key c60e5bce24856c2c473c4560772
If you do not use a valid TLS certificate for the exposed GoPhish instance, you may need to allow insecure TLS connections as well (such connections can be man-in-the-middled, so tread carefully):
config gophish insecure trueOnce all this is configured, your Evilginx instance is ready to go. You can test if the communication with GoPhish works properly by issuing the command:
config gophish testConfiguring GoPhish
Here I am assuming you are familiar with how to use GoPhish. If not, feel free to check out the documentation on how to get started.
Make sure GoPhish is running either in a tmux session or you set it up to run as a daemon. You can find more information on how to do it in this GitHub issue.
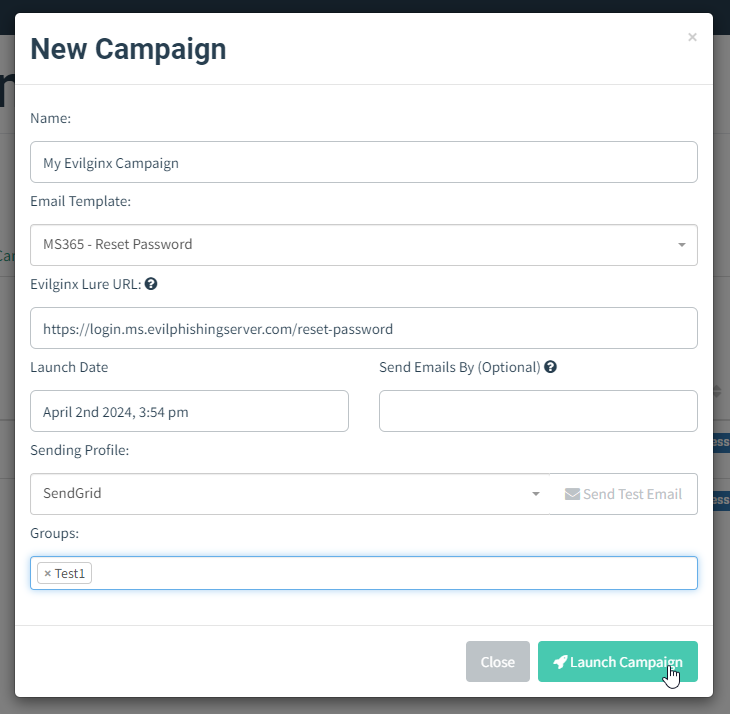
Once you have everything properly set up, it is time to set up your Campaign. Create the new campaign and then select the Email Template, Sending Profile and the group of recipients. You may notice that instead of being asked for the Landing Page profile you need to provide the Evilginx Lure URL.
Open your Evilginx instance, create the lure and grab the lure URL you want to send out in your phishing campaign, using the command:
lures get-url <id>Copy this URL and paste it into the Evilginx Lure URL text field of the campaign creation panel.
That's it! You can now send out the campaign emails while enjoying the full overview of your campaign progress within the GoPhish UI.
Custom TLS Certificates
Since the release of Evilginx 3.0, the tool has been using certmagic library for TLS certificate management with automated LetsEncrypt TLS certificate registration. Having to use only LetsEncrypt certificates is often not ideal as it may mark your phishing server, on an engagement, as suspicious.
Many people have requested support to use their own TLS certificates with Evilginx, including the wildcard certificates. This feature has finally been implemented.
To add your own TLS certificates, first, create a new directory under ~/.evilginx/crt/sites/ with the name of your website or hostname. The name does not matter and it can be anything you choose.
Evilginx will scan these directories looking for the public X509 certificate and the private key used to sign the certificate. The X509 certificate should have either the .pem or .crt extension, while the private key should have the .key extension.
For convenience, Evilginx will also recognize the keypair generated by CertBot, where the public certificate is named fullchain.pem and the private key is privkey.pem. You can copy both files into the same directory to add such a TLS certificate generated by CertBot.
Once you put your custom TLS certificates in the right place, don't forget to disable automated LetsEncrypt certificate retrieval with:
config autocert offIMPORTANT! Make sure the private key files are not password-protected or otherwise Evilginx may fail to load them.
Example 1:
~/.evilginx/crt/sites/wildcard.domain.com/fullchain.pem
~/.evilginx/crt/sites/wildcard.domain.com/privkey.pem
Example 2:
~/.evilginx/crt/sites/my_certificate/public.crt
~/.evilginx/crt/sites/my_certificate/private.key
CertMagic library will automatically add the TLS certificates to the managed pool and it will automatically respond with a valid TLS certificate.
HTTP Proxy IP Detection
I know some of you use Caddy, Apache or Nginx as an additional proxy layer, sitting in front of the Evilginx instance. This created an issue for Evilginx to properly detect the origin IP address of incoming requests. Since all requests were proxied through a local web server, the origin IP would default to 127.0.0.1, completely ignoring the additional HTTP headers added by the proxies, with the correct origin IP addresses as values.
Since this update, Evilginx will properly recognize the origin IP address of all proxied HTTP requests. The list of monitored HTTP headers is as follows:
X-Forwarded-For
X-Real-IP
X-Client-IP
Connecting-IP
True-Client-IP
Client-IP
JSON support in force_post
Thanks to @yudasm_ contribution, you can now enjoy injecting your custom POST parameters within body contents transmitted in JSON format.
Check out Yehuda's recent blog post on how he used this feature to evade FIDO2 authentication when phishing MS365 accounts.
Fixed a bug used to detect Evilginx
Keanu Nys reported an issue, in the BREAKDEV RED channel, where he found that one of the online URL scanners he used was able to open the phishing page by visiting the URL with just a hostname, without a valid lure URL path.
There was a bug in Evilginx, which would only enforce valid lure URLs for phishing hostnames, which were defined with session: true in the proxy_hosts section of the phishlet file.
Upon closer inspection, I've decided that the session parameter never made sense and it is now obsolete. Every proxy_hosts entry is treated as if session was set to true.
BUGFIX 🐛: Fixed a pretty serious flaw in Evilginx, which allowed scanners to detect phishing pages, bypassing the unauthorized requests protection and blacklist rules.
— Kuba Gretzky (@mrgretzky) February 28, 2024
Pull from master and enjoy! 🥳
Big thanks to Keanu Nys for finding this. 💗https://t.co/v7eQdK4Ugw
Keanu wrote a great post-mortem post about the bug he found, so if you're interested in learning more about it, you can find it here.
Fixed the infinite redirection loop
Evilginx, since forever, had a very annoying bug, which would trigger the infinite redirection loop, whenever the lure URL path was set to be the same as the login path of the targeted website.
This has now been fixed and Evilginx will also make an additional check to compare if the lure URL contains the valid phishing domain used by the landing phishing page.
Added support for more TLDs
Over the years, there have been multiple new TLDs launched for registering domains. Evilginx will try hard to detect all URLs in proxied packets and convert them either from phishing domains to original domains or from original domains to phishing domains.
To be more efficient, it relies on the detection of URLs ending with known TLDs. Some of the newer TLDs have not been supported and this update changes that.
Here is the new list of all supported TLDs:
aero
arpa
art
biz
bot
cat
click
cloud
club
com
coop
edu
game
gov
inc
info
ink
int
jobs
live
lol
mil
mobi
museum
name
net
online
org
pro
root
shop
site
tech
tel
today
travel
vip
wiki
xyz
[all known 2 character TLDs]
Changelog
Here is the whole Evilginx 3.3 changelog with some additional changes and fixes I did not mention in this post:
3.3.0
- Feature: Official GoPhish integration, using the fork: https://github.com/kgretzky/gophish
- Feature: Added support to load custom TLS certificates from a public certificate file and a private key file stored in
~/.evilginx/crt/sites/<hostname>/. Will loadfullchain.pemandprivkey.pempair or a combination of a.pem/.crt(public certificate) and a.key(private key) file. Make sure to run without-developerflag and disable autocert retrieval withconfig autocert off. - Feature: Added ability to inject
force_postPOST parameters into JSON content body (by @yudasm_). - Feature: Added ability to disable automated TLS certificate retrieval from LetsEncrypt with
config autocert <on/off>. - Feature: Evilginx will now properly recognize origin IP for requests coming from behind a reverse proxy (nginx/apache2/cloudflare/azure).
- Fixed: Infinite redirection loop if the lure URL path was the same as the login path defined in the phishlet.
- Fixed: Added support for exported cookies with names prefixed with
__Host-and__Secure-. - Fixed: Global
unauth_urlcan now be set to an empty string to have the server return403on unauthorized requests. - Fixed: Unauthorized redirects and blacklisting would be ignored for
proxy_hostswithsession: false(default) making it easy to detect evilginx by external scanners. - Fixed: IP address
127.0.0.1is now ignored from being added to the IP blacklist. - Fixed: Added support for more TLDs to use with phishing domains (e.g.
xyz,art,tech,wiki,lol& more) - Fixed: Credentials will now be captured also from intercepted requests.
Conclusion
I'm happy to have finally been able to include the most requested features, together with some quality-of-life improvements, before the Evilginx Pro release this year.
Please let me know your feedback about the update, either on Twitter @mrgretzky or in BREAKDEV RED Discord.
Looking forward to your opinion!
If you're reading this before 3rd April 2024, you can still get a 30% discount for the Evilginx Mastery course, which I am constantly updating and you get access for a lifetime. Expect to see the GoPhish integration guide added sometime in the future.
Happy phishing!
-- Kuba Gretzky