Evilginx 2.3 - Phisherman's Dream
Welcome to 2019!
As was noted, this will be the year of phishing automation. We've already seen a release of new reverse-proxy tool Modlishka and it is only January.
This release would not have happened without the inspiration I received from Michele Orru (@antisnatchor), Giuseppe Trotta (@Giutro) and Piotr Duszyński (@drk1wi). Thank you!
This is by far the most significant update since the release of Evilginx. The 2.3 update makes it unnecessary to manually create your own sub_filters. I talked to many professional red teamers (hello @_RastaMouse) who have struggled with creating their own phishlets, because of the unfair, steep learning curve of figuring out what strings to replace and where, in the proxied HTTP content. I can proudly say that these days are over and it should now be much easier to create phishlets from scratch.
If you arrived here by accident and you have no idea what I'm talking about, check out the first post on Evilginx. It is a phishing framework acting as a reverse proxy, allowing to bypass 2FA authentication.
Let's jump straight into the changes.
Changelog - version 2.3
Here is a full list of changes in this version:
- Proxy can now create most of required
sub_filterson its own, making it much easier to create new phishlets. - Added lures, with which you can prepare custom phishing URLs, each having its own set of unique options (
help luresfor more info). - Added OpenGraph settings for lures, allowing to create enticing content for link previews.
- Added ability to inject custom Javascript into proxied pages.
- Injected Javascript can be customized with attacker-defined data, specified in lure options.
- Deprecated
landing_pathand replaced it with aloginsection, which contains the domain and path for website's login page.
Diving into more detail now.
Automatic handling of
sub_filters
In order for Evilginx to properly proxy a website, it must not stray off its path and it should make sure that all proxied links and redirections are converted from original URLs to the phishing URLs. If the browser navigates to the original URL, the user will no longer be proxied through Evilginx and the phishing will simply fail.
I am aware it was super hard to manually figure out what strings to replace and it took considerable amounts of time to analyze HTML content of every page to manage substitutions, using trial and error method.
Initially I thought that doing the automatic URL substitution, in page body, will just not work well. The guys I mentioned at the top of this post, proved me wrong and I was amazed how well it can work when properly executed. When I saw this method successfully implemented and demonstrated in Modlishka, I was blown away. I knew I had to try and do the same for Evilginx.
It took me a whole weekend to implement the required changes and I'm very happy with the outcome. You can now start creating your phishlet without any sub_filters at all. Just define the proxy_hosts for the domains and subdomains that you want to proxy through and it should work out-of-the-box. You may need to create your own sub_filters only if there is some unusual substitution required to bypass security checks or you just want to modify some HTML to make the phishing scenario look better.
Best thing with automated sub_filters generation is the fact that the whole website's functionality may fully work, through the proxy, even after the user is authenticated (e.g. Gmail's inbox).
Phishing with lures
The tokenized phishing link with redirection URL, encoded in base64 format, was pretty ugly and definitely not perfect for carefully planned phishing attacks. As an improvement, I thought of creating custom URLs with attacker-defined path. Each assigned with a different redirection URL, which would be navigated to on successful authentication through the phishing proxy. This idea eventually surfaced in form of lures.
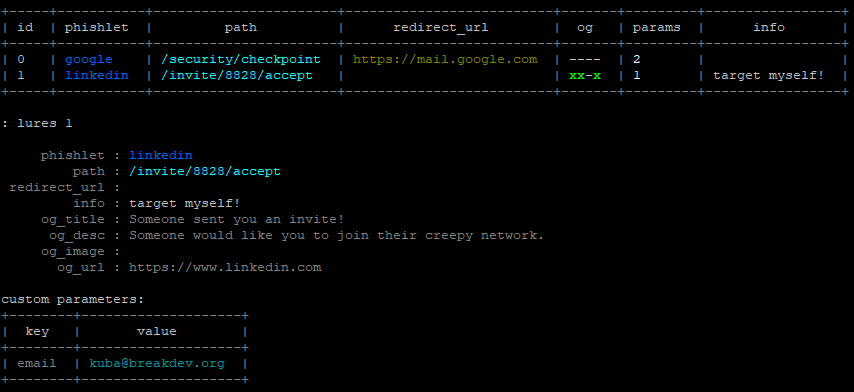
You can now create as many lures as you want for specific phishlets and you are able to give each of them following options:
- Custom path to make your phishing URLs look more inviting to be clicked.
- Redirection URL to navigate the user to, after they successfully authenticate.
- OpenGraph features, which will inject
<og:...>meta tags into proxied website to make the phishing links generate enticing previews when sent in messengers or posted to social media. - Customized script content, which will be embedded into your injected Javascript code (e.g. for pre-filling the user's email address).
- Description for your own eyes to not forget what the lure was for.
Here is how OpenGraph lure configuration can be used to generate an enticing preview for WhatsApp:
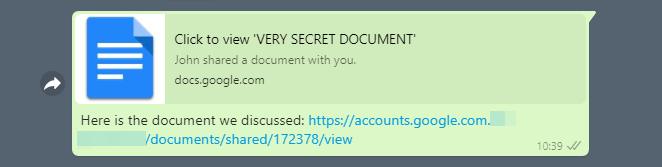
On clicking the link, the user will be taken to the attacker-controlled proxied Google login page and on successful authentication, he can be redirected to any document hosted on Google Drive.
The command for generating tokenized phishing links through phishlets get-url still works, although I'd consider it obsolete now. You should now generate phishing URLs with pre-created lures instead: lures get-url 0
To get more information on how to use lures, type in help lures and you will get a list of all sub-commands you can use.
Javascript injection
Now you can inject any javascript code into the proxied HTML content, based on URL path or domain. This gives incredible capabilities for customizing your phishing attack. You could for example make the website pre-fill the email of your target in the authentication form and display their profile photo.
Here is the example of injected javascript that pre-fills the target's email on LinkedIn login page:
js_inject:
  - trigger_domains: ["www.linkedin.com"]
    trigger_paths: ["/uas/login"]
    trigger_params: ["email"]
    script: |
      function lp(){
        var email = document.querySelector("#username");
        var password = document.querySelector("#password");
        if (email != null && password != null) {
          email.value = "{email}";
          password.focus();
          return;
        }
        setTimeout(function(){lp();}, 100);
      }
      setTimeout(function(){lp();}, 100);
You can notice that the email value is set to {email}, which lets Evilginx know that this will be replaced with the value set in the created lure. Setting the email value would be done the following way.
: lures edit params 0 email=target@domain.com
See that the trigger_params variable contains the email value, which means that this javascript will ONLY be injected if the email parameter is configured in the lure used in the phishing attack.
Here is a demo of what a creative attacker could do with Javascript injection on Google, pre-filling his target's details for him:

Removal of
landing_urlsection
To upgrade your phishlets to version 2.3, you have to remove landing_url section and replace it with a login section.
I figured you may want to use a different domain for your phishing URL than the one, which is used to display the login page. For example Google's login page is always at domain accounts.google.com, but you may want the phishing link to point to a different sub-domain like docs.phished-google.com. That way you can add docs.google.com to proxy_hosts and set the option to is_landing: true.
The login section should contain:
login:
  domain: 'accounts.google.com'
  path: '/signin/v2/identifier'
IMPORTANT! The login section always defines where the login page resides on the targeted website.
That way the user will be automatically redirected to the login page domain even when the phishing link originated on a different domain.
Refer to the official phishlets 2.3.0 documentation for more information.
Have fun!
I can proudly say that now the phishlet format is close to being perfect and, since the difficulty of creating one from scratch significantly dropped, I will be starting a series of blog posts teaching how to create a phishlet from scratch, including how to configure everything.
The series will start very soon and posts will be written in hands-on step by step format, showing the whole process of phishlet creation from start to finish, for the website that I pick.
Make sure to follow me on Twitter if you want up-to-date information on Evilginx development.